When it comes to minor hockey, a strong, accurate shot can be a major advantage on the ice. But what are the best practices for shooting technique and at what ages should players begin exploring different shot styles?
Let’s look at what basic shooting techniques you’ll see at the professional level, break down their technique, and then look at how this applies to young players. Below is a “menu” of the three most common ways elite players set up their hands and body when they shoot. They’re all seen in NHL rinks, but they trade-off power, accuracy, and release speed.
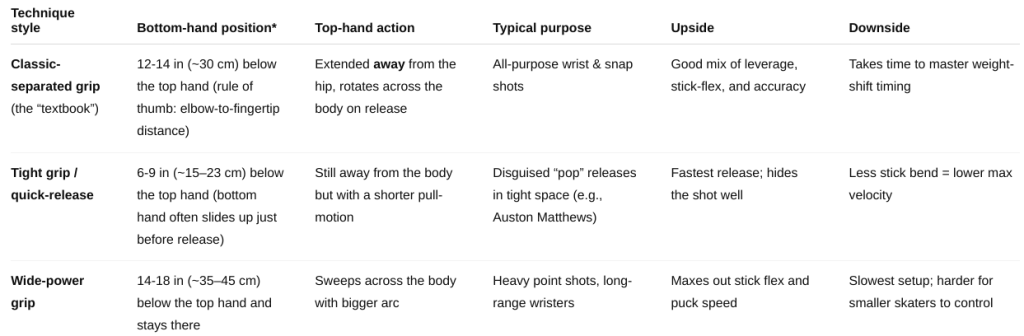
*Measured while the player is in a balanced hockey stance, knees bent, puck set beside the inside skate.
Biomechanics in plain language
It’s worth understanding the language of shooting technique so when you explore drills and coaching tips you understand what they’re actually referring to. Below are the most common shooting terminologies you’ll come across in today’s game.
- Lever length
- More separation = longer lever → more shaft flex → higher puck speed.
- Less separation shortens the lever → quicker rotation but less stored energy.
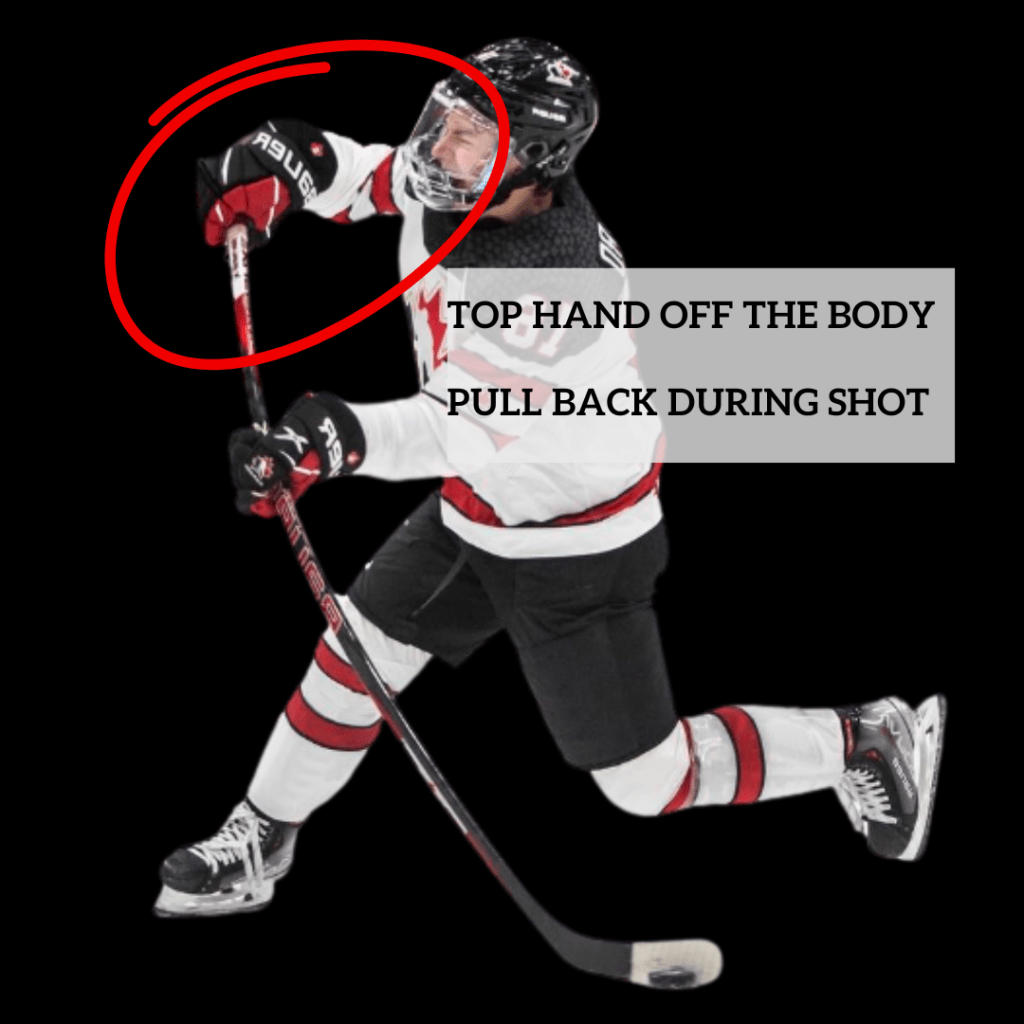
- Top-hand freedom
- Pulling the top hand away from the torso lets the shaft “hinge,” creating both flex and accuracy.
- When it’s stapled to the hip, the blade can’t roll properly and shots sail or flutter.
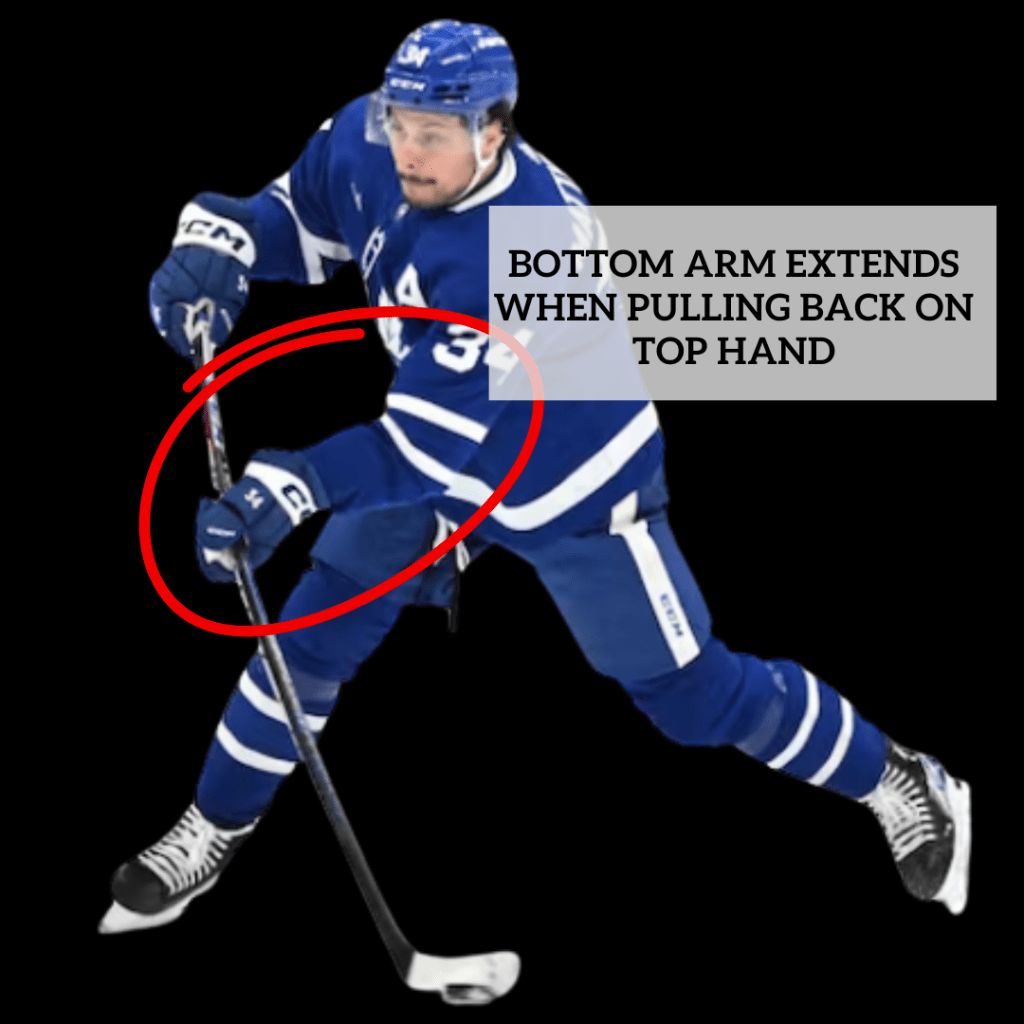
- Bottom-hand slide vs. fixed
- Elite shooters often slide the bottom hand a few inches during the load phase, then lock it for the release.
- Younger skaters who clamp the bottom hand in one spot lose that whip effect.
- Weight transfer & knee drive
- Regardless of grip, power still comes from shifting weight from the back skate to the front and driving the knees—not just arm strength.

What should young players (U10–U14) learn first?
Choosing the proper progressions is important for long-term mechanics, and sometimes we try to rush kids into NHL style shooting too early. For example, young players need to learn proper knee bend, stability, and strong skating technique before focusing too much on shooting technique. Parents often believe their child needs to work on their shot when in reality they don’t have the stability and strength on their skates to transfer power onto their stick. If you don’t have a strong skater, you won’t have a strong shooter.
But once your player is strong on their skates and ready to progress, here is a basic chart of what minor players should work on.
| Skill element | Why it matters for kids |
|---|---|
| Classic-separated grip (~12-14 in) with free top hand | Provides the best blend of control, power, and proper mechanics without demanding adult-level strength. |
| Hands & puck in front of body | Keeps eyes up, promotes balance, prevents “hip-locked” top-hand habit. |
| Bottom-hand mobility drill | Teach players to slide the bottom hand slightly (stickhandling glove to mid-shaft) before locking for the shot—builds stick-load awareness. |
| Full-body load → snap | Emphasize knee bend, back-to-front weight shift, and chest-over-puck posture; arms alone can’t do it. |
| Progression to other styles later | After they can repeat a strong, accurate classic release, introduce tight-grip quick shots for deception and wide-grip power shots when strength increases (~age 12+). |
So what technique should young players use?
For most developing players, the “classic” grip—moderate hand separation with the top hand pushed out and active weight transfer—is the best foundational technique. It ingrains the leverage and body mechanics that every other modern NHL release builds on. Once that movement pattern is automatic, coaches can layer in quicker or more powerful variations without unlearning bad habits formed early. There’s no one-size-fits-all path to strong shooting technique, so be flexible in what you’re willing to teach your player and when. Just be sure not to get ahead of their development and spend lots of time on the basics. Faster is not better when it comes technical progressions.

Leave a comment